Job Orchestration
Job Orchestration allows users to connect more than one ETL job and process them together. Instead of scheduling jobs individually, users can schedule jobs together in an Orchestration. When creating an Orchestration, admins can determine the order in which jobs are run.
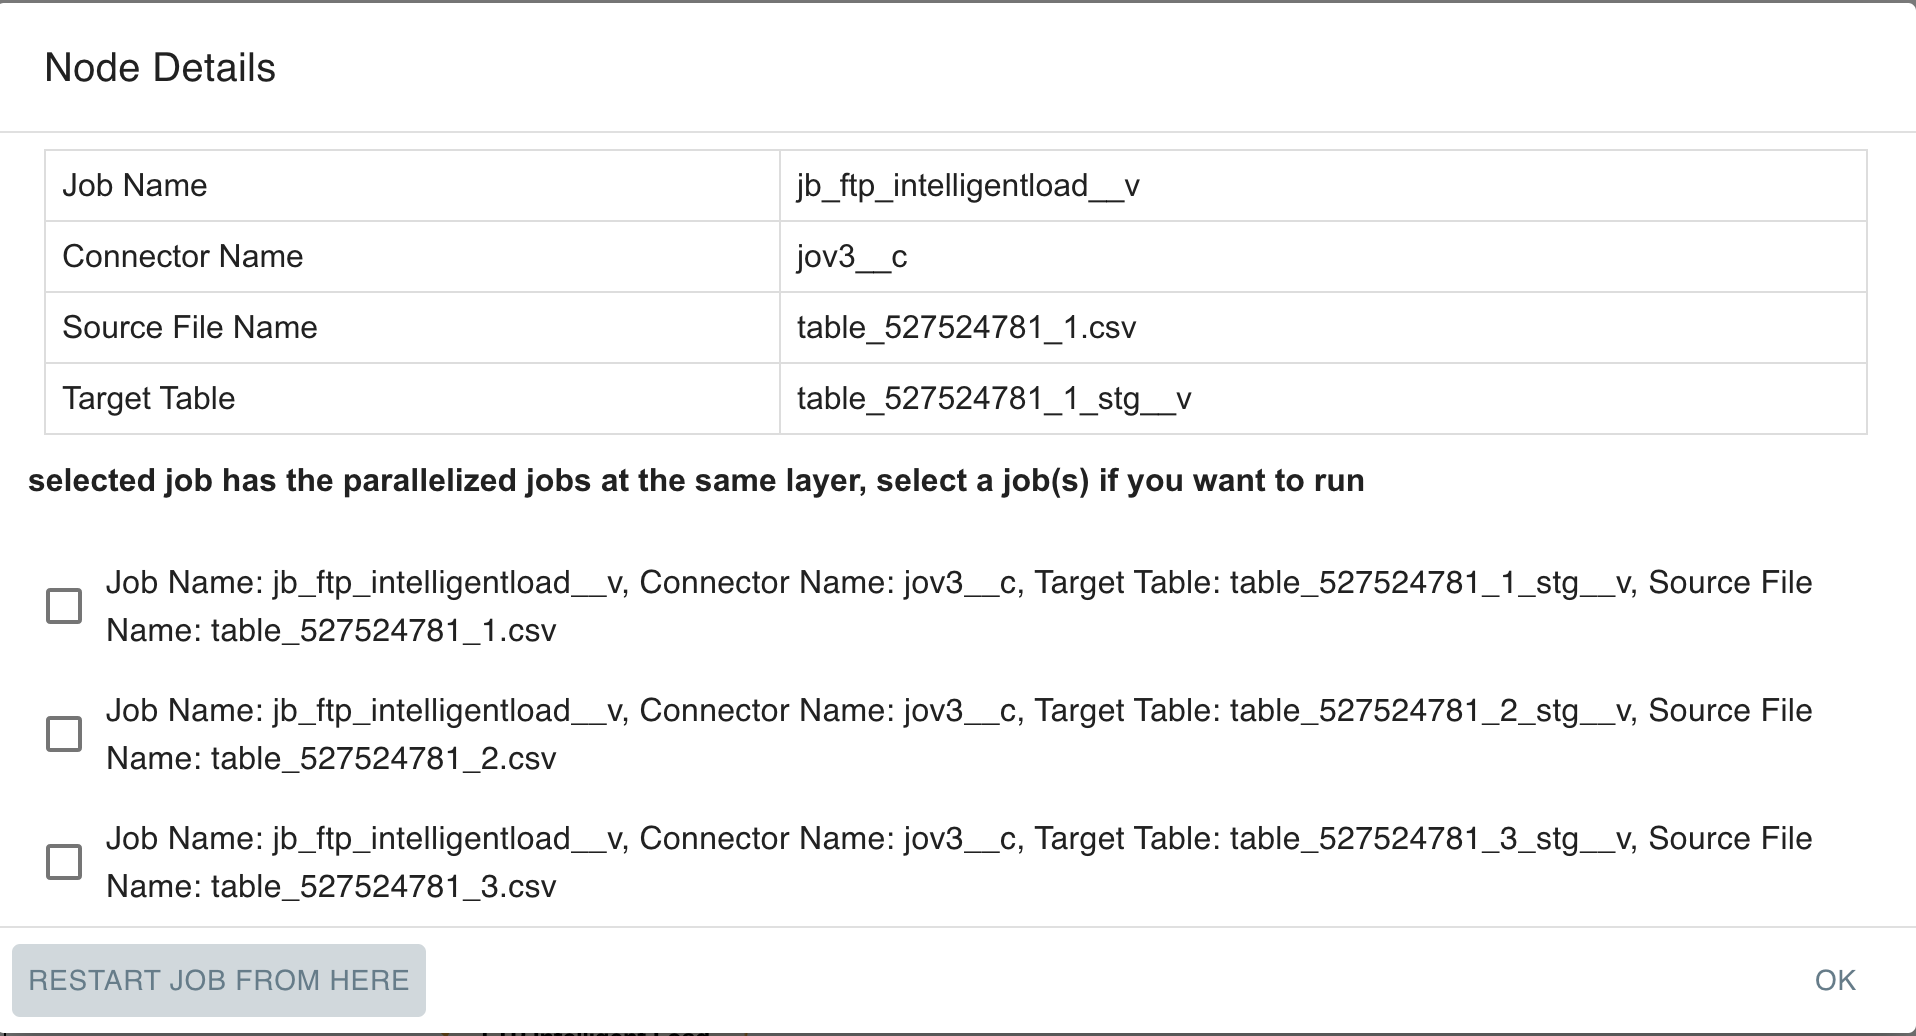
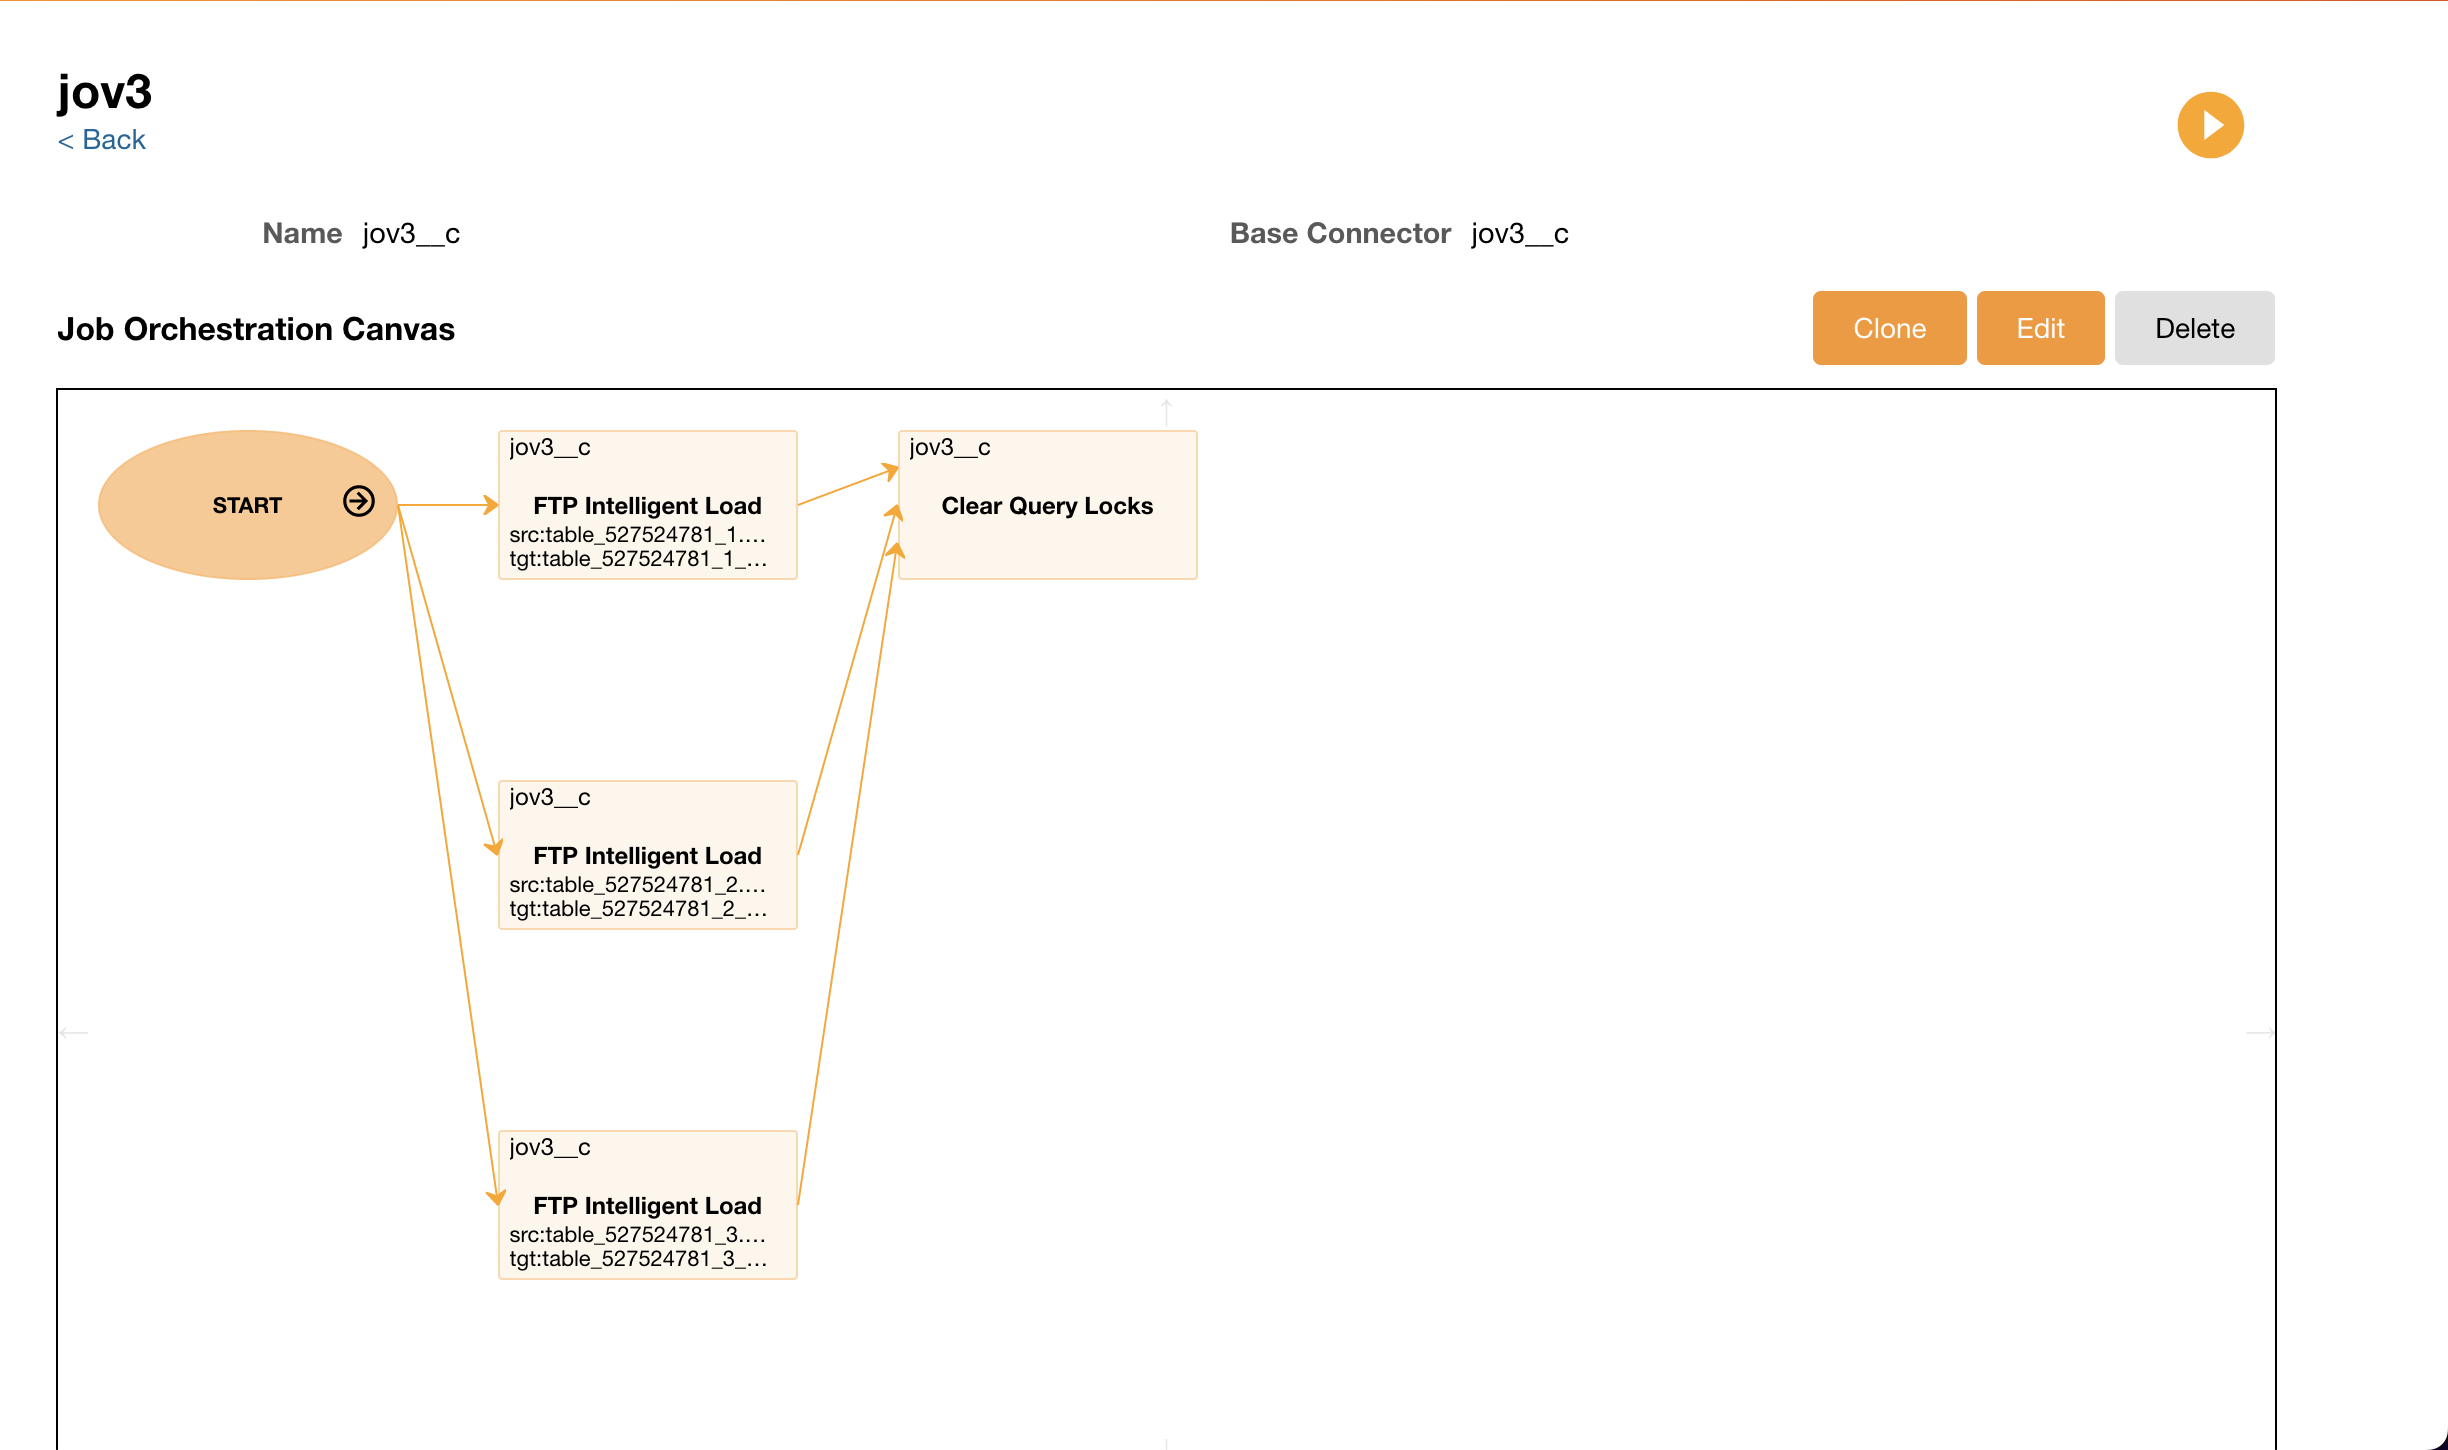
Basic connector and jobID information displays when a Job node in the Job Orchestration flow is selected. For FTP jobs, source and target table information also display.
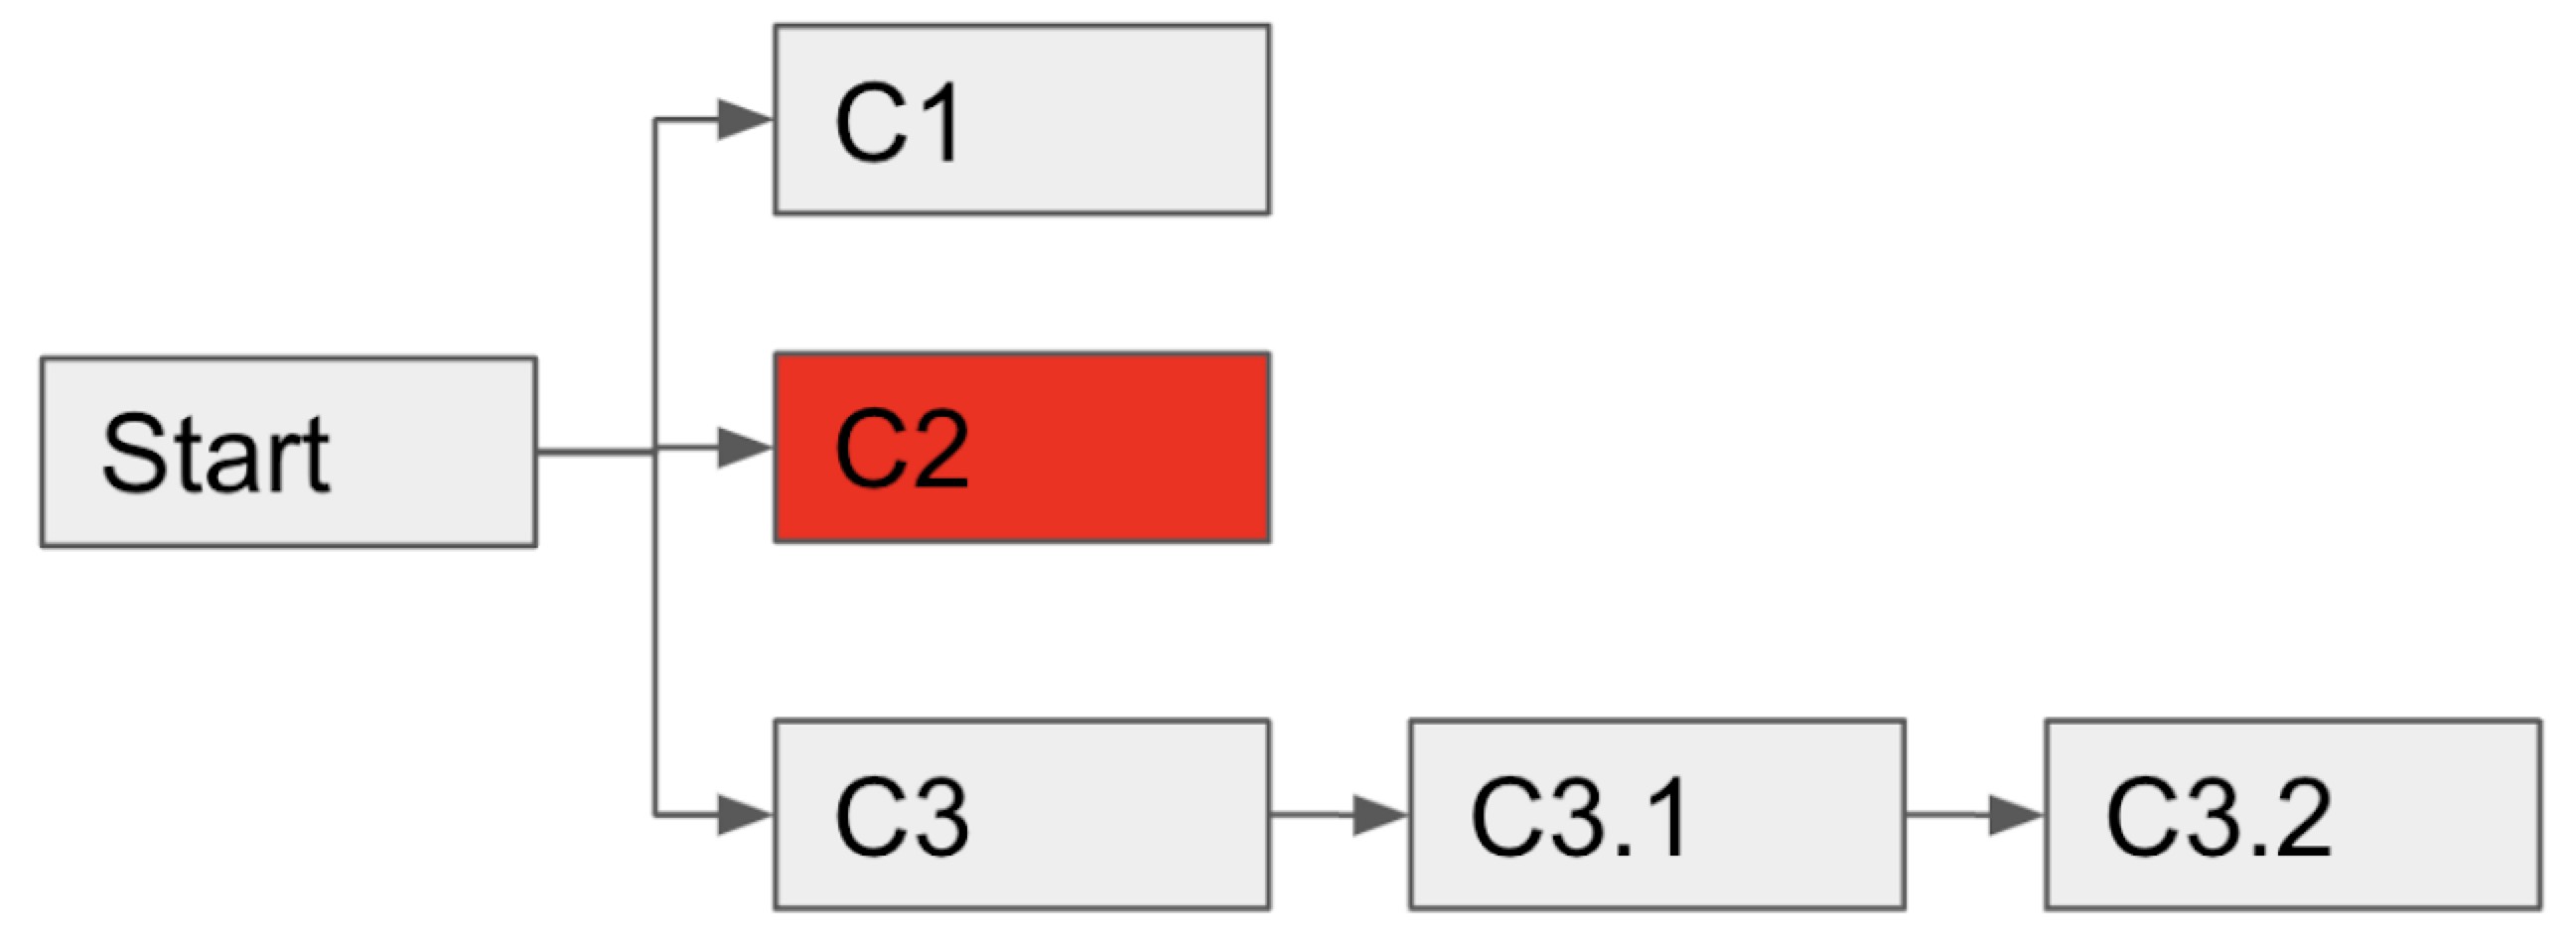
The Nitro ETL engine supports proceeding an independent job flow in a JO when non-dependent job failure happens. The following graphic shows how if C2 fails, the Nitro ETL engine proceeds with C3.1 and C3.2.
Each Job Orchestration is limited to 50 jobs total. When a Job Orchestration runs, Nitro computes the total number of jobs required to complete the entire Job Orchestration. If more than 50 jobs are needed to complete the Job Orchestration, the entire Job Orchestration will not run and fail with the error 'Job Orchestration Error: Exceeds maximum number of Job steps allowed in a Job Orchestration.'
Admins can migrate job orchestrations, including those with multiple connector jobs, from one instance to another. For example, admins can configure and test a job orchestration in a test instance, then download the job orchestration package from the connector and upload the package to a connector in the production instance to merge the configuration.
To create a new Job Orchestration:
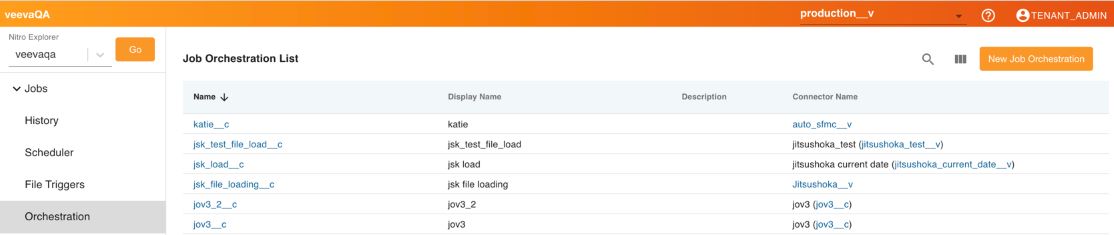
- Navigate to the NAC and select Orchestration.
- Select New Job Orchestration.
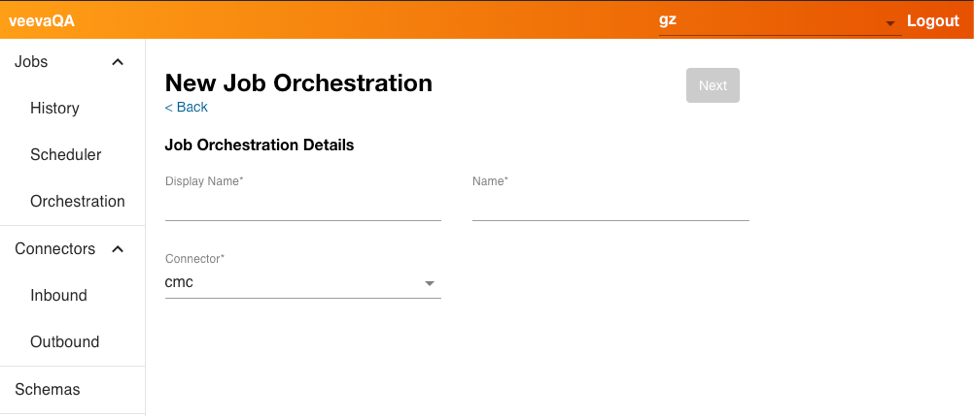
- Enter the appropriate information, including the Connector.
- Select Next.

- Select Add Job.
- Select the drop-down for Job and select the first job you want to add. Only Jobs that are already created display in the list.
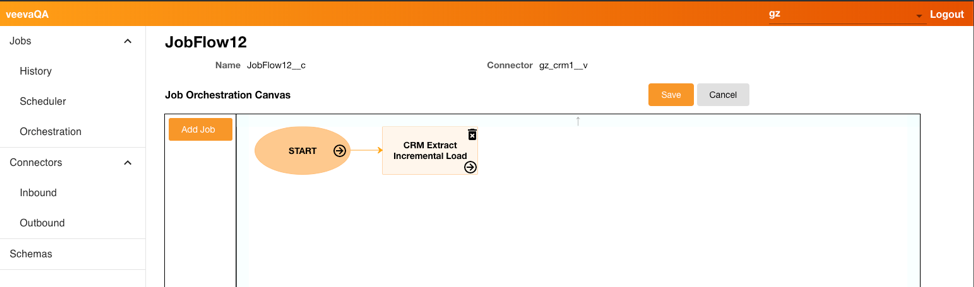
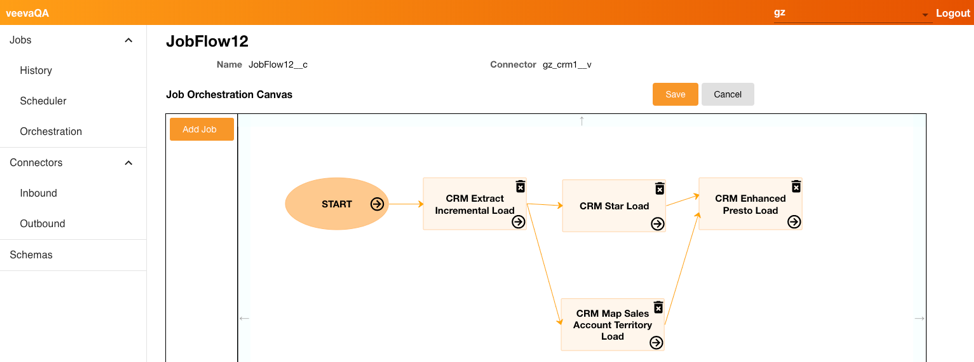
- Continue to add other jobs to the orchestration, dragging and dropping in the order you want the jobs processed. Jobs can be processed sequentially or in parallel.
- Select Save.
Once the Job Orchestration is saved, admins can run the job manually by selecting Run Job or by selecting the Play button on the Job Orchestration details page, or schedule the job to run at a later time at regular intervals.
Each job in the orchestration must successfully complete before the next job begins processing.
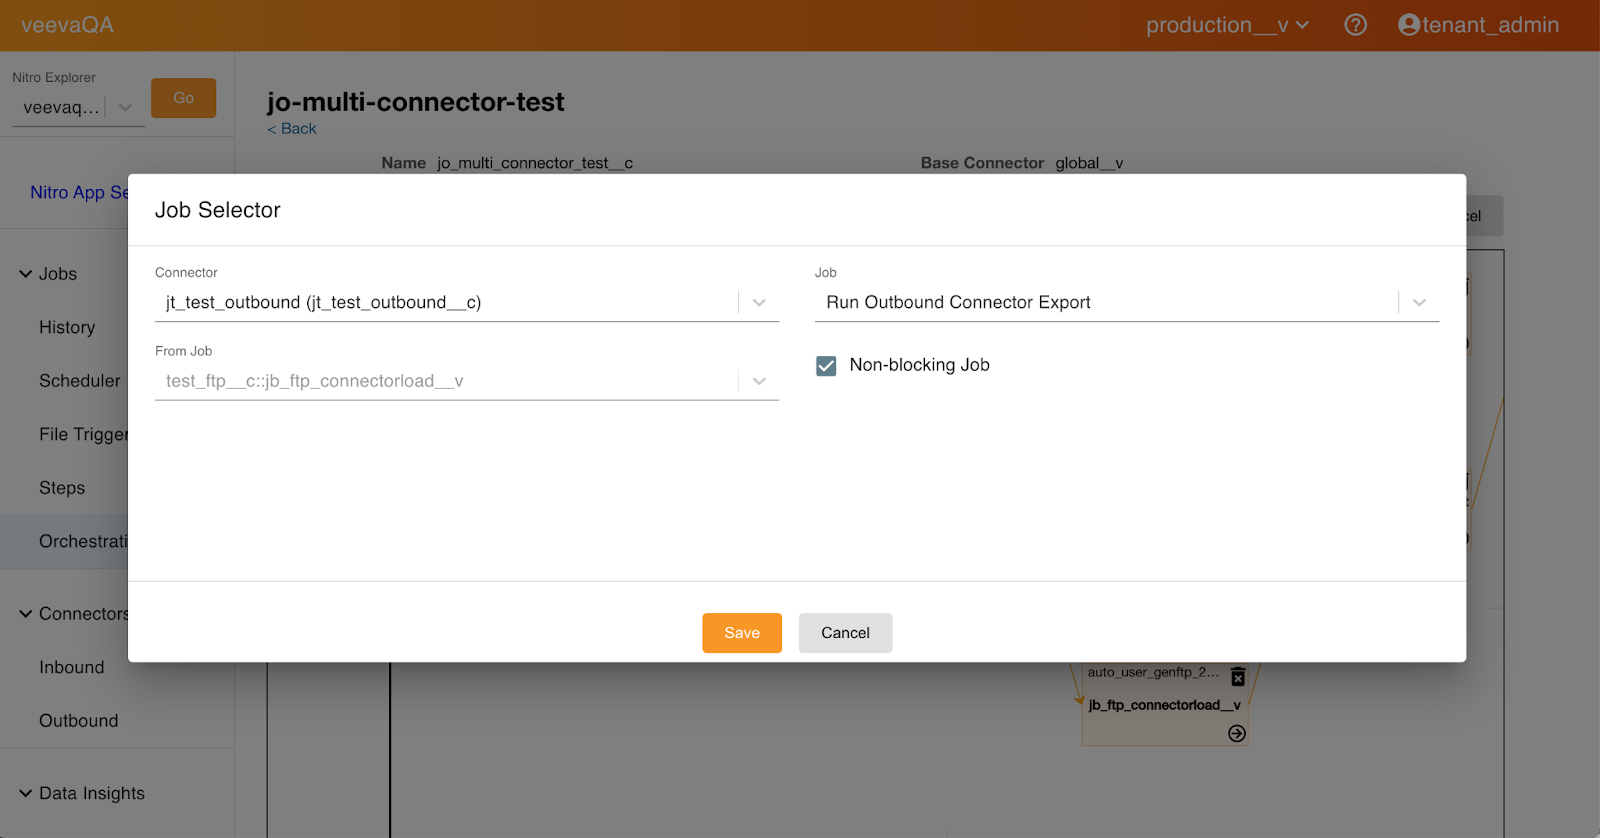
Indicating a Non-Blocking Job in a Job Orchestration
Admins can specify a job (or multiple jobs) in a job orchestration as non-blocking (not critical). When the Non-blocking Job option is selected, Nitro skips that job if it fails and continues processing all other jobs in the Job orchestration. This allows the Nitro ETL (Extract, Transform, Load) process to continue with the other dependent, more critical, jobs in a job orchestration without interruption.
To configure the non-blocking job:
-
Log into the NAC.
-
Select Orchestration from the side menu.
-
Select the appropriate job orchestration.
-
Select the Non-blocking Job check box.
-
Select Save.
Admins can verify the configuration by viewing the Job Orchestration detail page. A green Fast Forward icon indicates a non-blocking job.
Data Quality Jobs in Job Orchestration Flow
Data Quality jobs can be added to Job Orchestration flows to allow the systems to detect invalid data early in the job process, preventing it from being added to downstream reports. Job Orchestrations with a Data Quality node display a rule/group alert status (RED/YELLOW/GREEN). For RED status (violations exceeded threshold), the downstream dependent jobs are aborted.
Data quality validation can also be inserted between STG and ODS load jobs for FTP Intelligent Job Orchestration flows. The validation step shows all rules/groups under the base connector and global connector. Users select one to run after loading to STG and before loading to ODS. This allows violations in the source data that exceed set thresholds to be detected while still in the Staging layer, so that users can abort subsequent loads into ODS and correct any bad records before re-submitting the job.
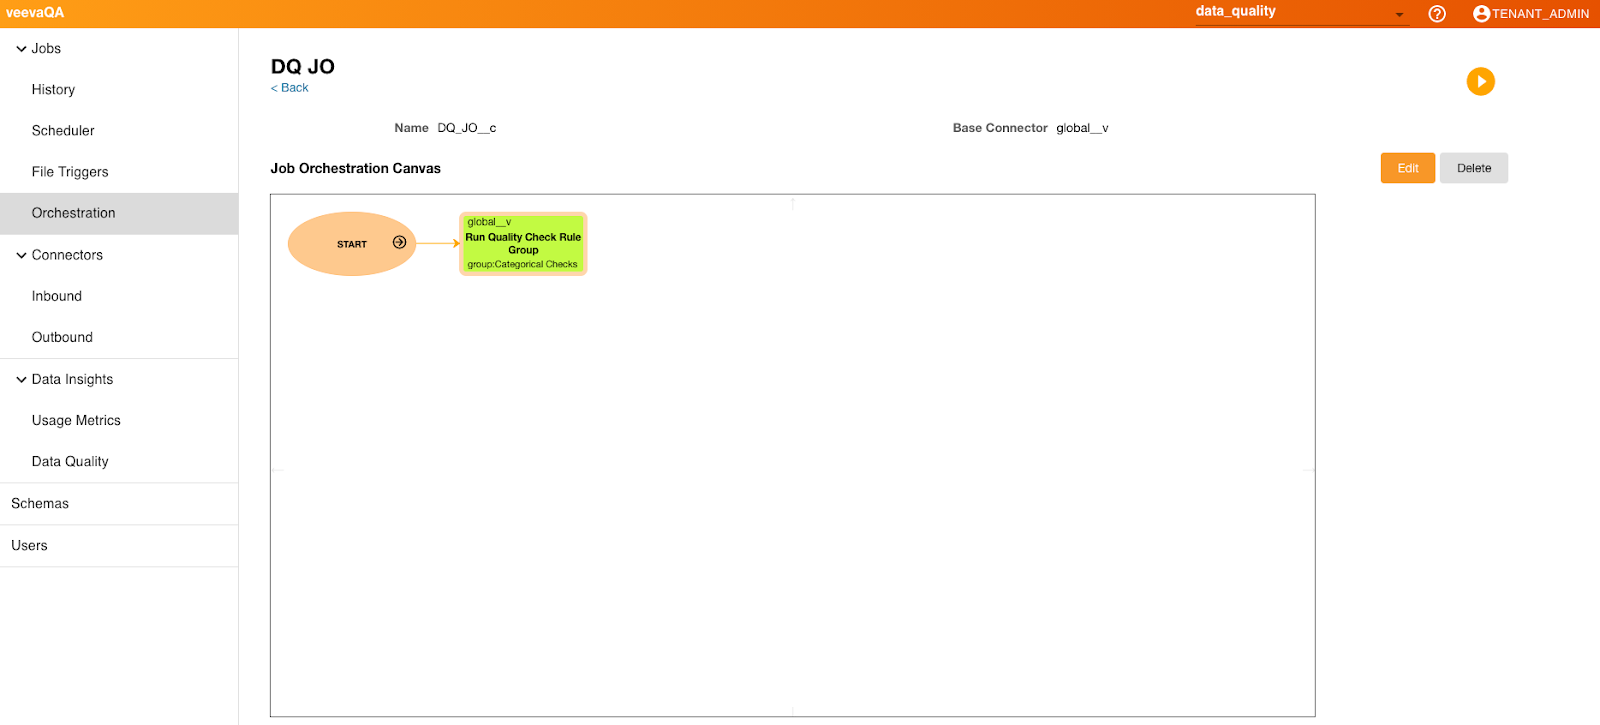
If a data quality job is added to a Job Orchestration, when selected, metadata related to the rule/group with connector and job information displays.
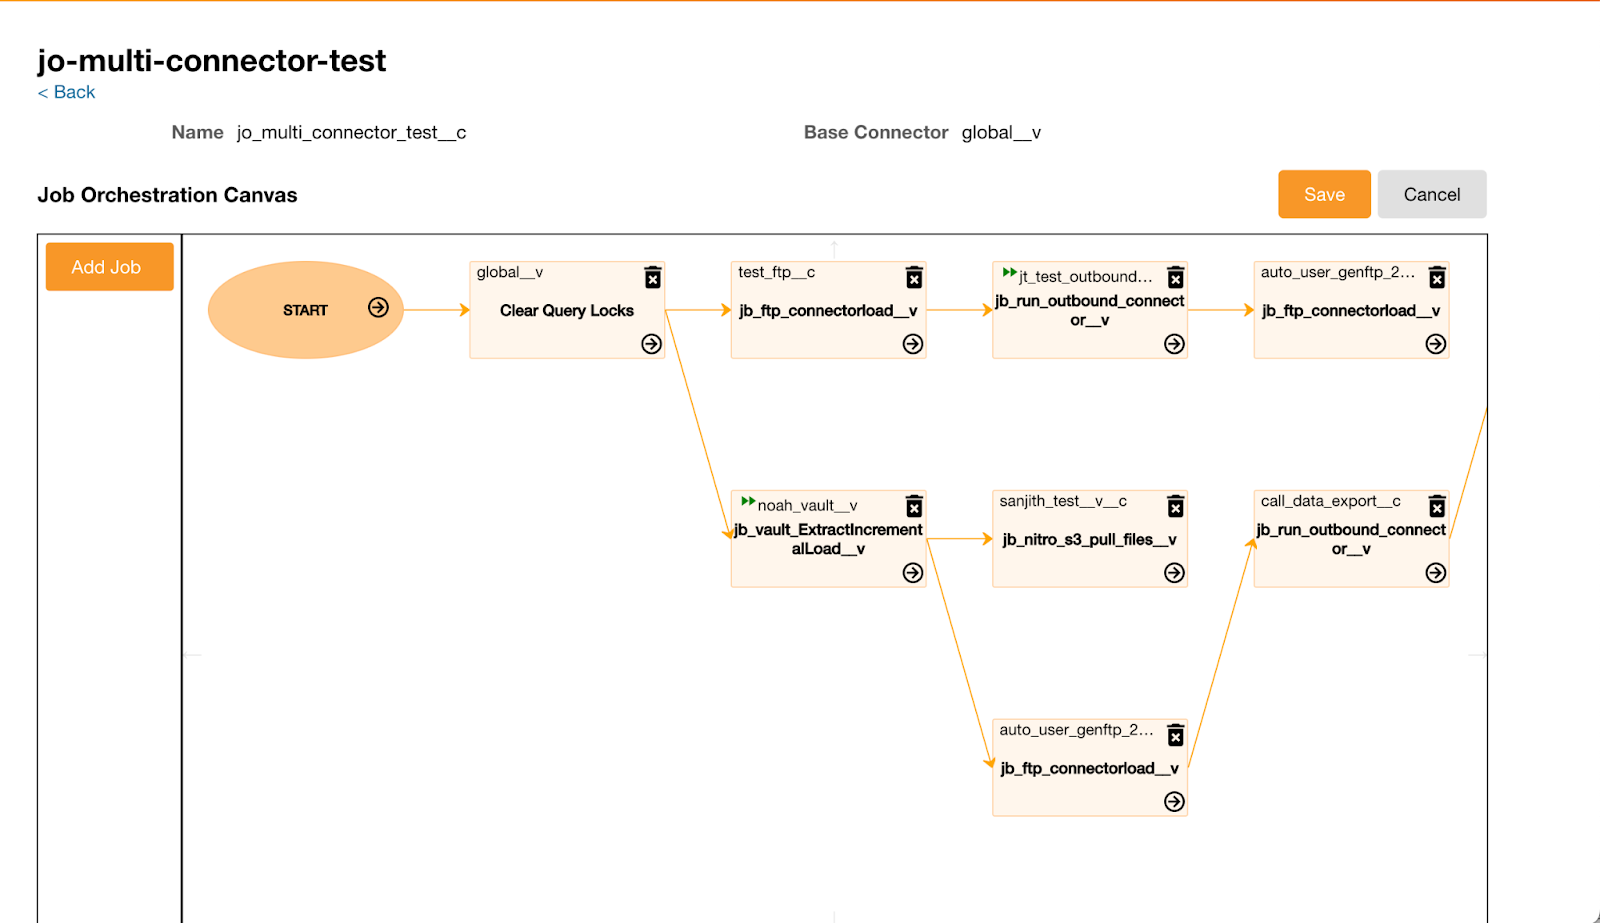
Job Orchestration Across Connectors
Admins can orchestrate jobs to include multiple inbound connectors and outbound connectors and create a defined order of processing. This eliminates the need to create separate jobs orchestrations that depend on one to finish before the next one can begin.
For example, Larry Lakes creates a new job orchestration. He selects the CRM inbound connector to extract the latest interaction data from CRM and at the same time, selects an outbound connector for exporting the data to the external system.
To create a Job Orchestration across Connectors:
- Navigate to the NAC.
- Select New Job Orchestration.
- Select Job Selector.
- Select the appropriate information.
- Select Add.
The jobs in the existing job orchestration are automatically populated to the base connector.
Job Orchestration Errors
Each job in the Job Orchestration displays in the Job History page with the same job ID. When one of jobs in a Job Orchestration fails, the job displays with failed status and the remaining jobs do not process. Users can view the information in the job details with a description. If a file is missing from a job orchestration containing multiple files, the error message displays with the missing filename.
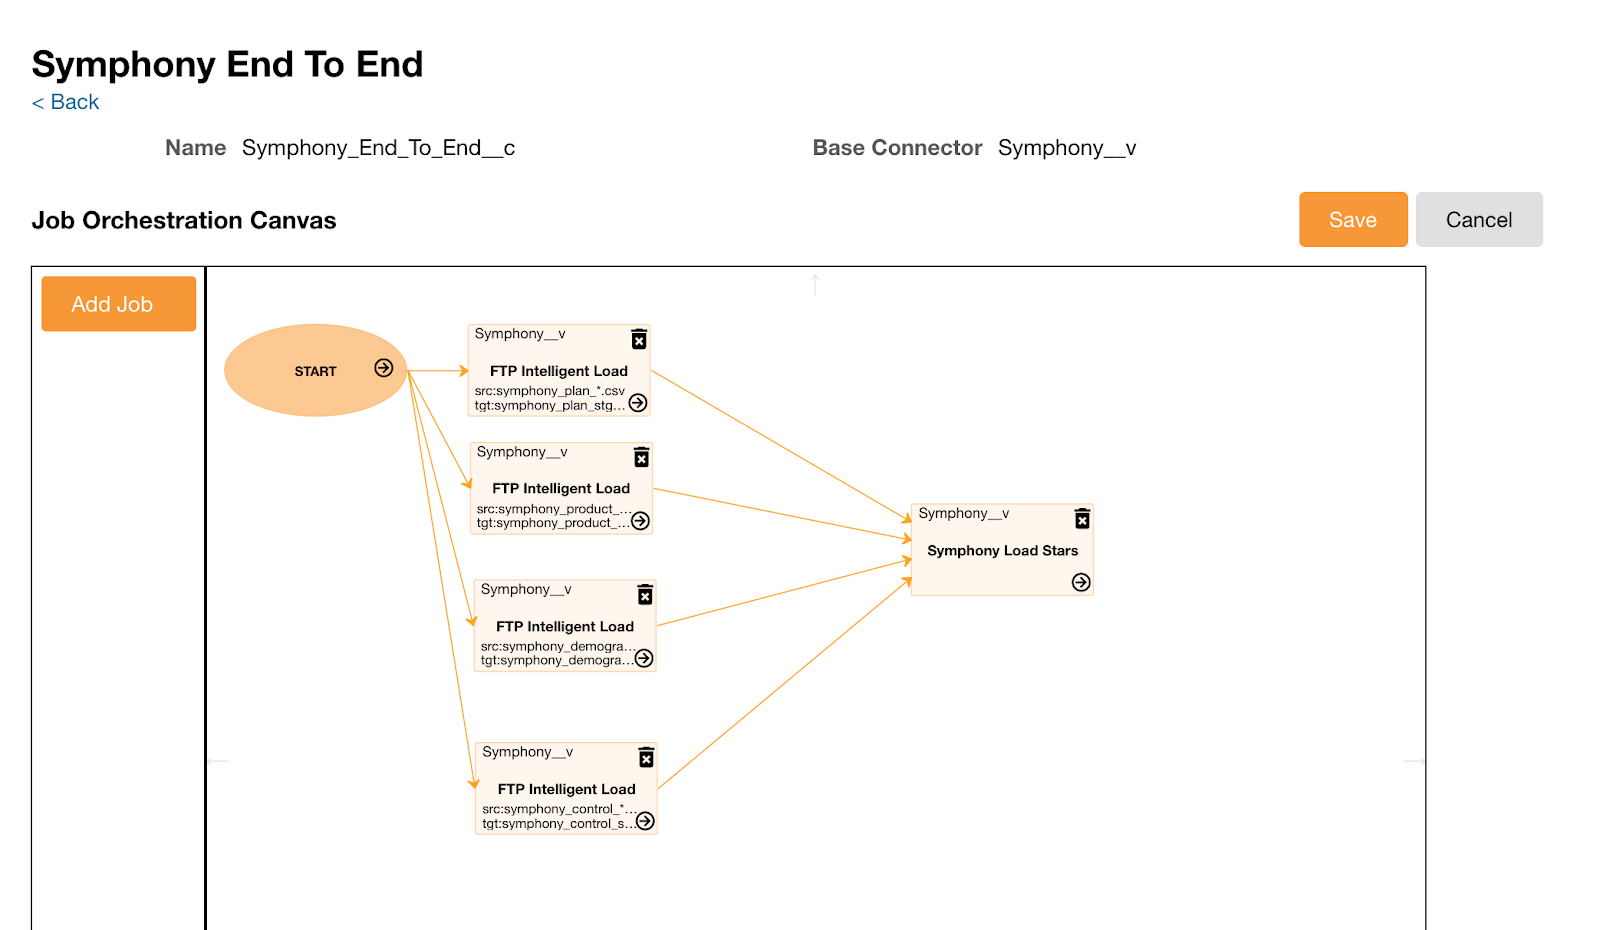
Job Orchestration File Loading
Admins can include file loading jobs within a job orchestration. Admins can configure an end-to-end process that incorporates the file loading job along with other jobs. Admins do not need to insert a control file for each source file.
For example, admins can orchestrate four source files that load a connector and a star table creation job.
Considerations for File Triggers
- File triggers should be a small file size. (less than 1MB)
- File triggers cannot start multiple jobs or job orchestrations.
- To run a job orchestration incorporating the file loading job, a file trigger is required to start it.
- File triggers should be placed last. Other source files to load should exist before the file trigger.
- If the file trigger is a source file to load, in the job orchestration, set up a job to load the file trigger to a target table.
To create a job orchestration with file loading jobs:
- Set up a job orchestration.
- Select the Add Job button.
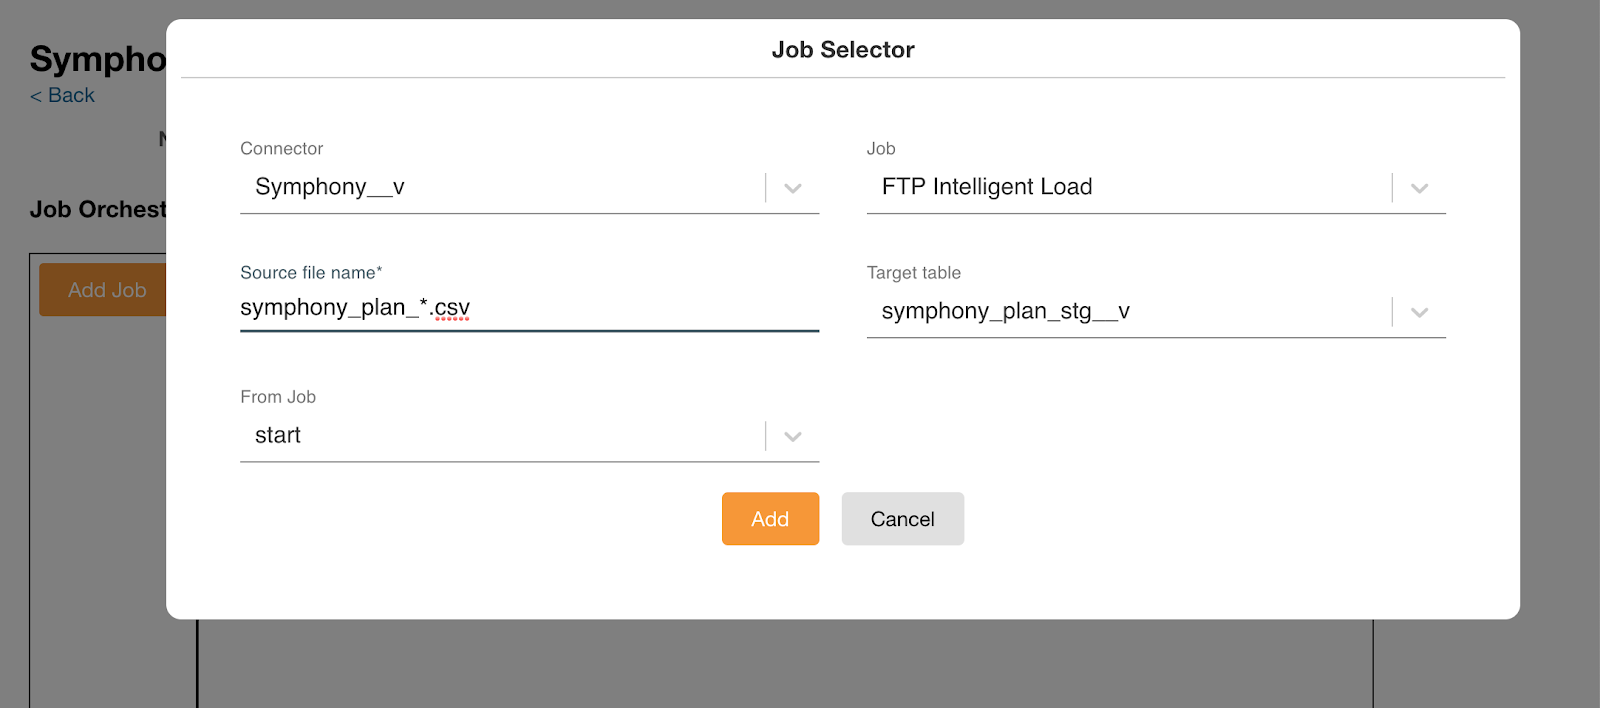
- Select a file loading job. A Job Selector window displays.
- Enter the source file name. If there are multiple sources, use the wildcard symbol (*) so that all files are loaded sequentially.
- Select the target table from the selected connector.
-
Select the Load Multiple Source Files check box if there are multiple sources. This step is optional.
A cycle icon displays in the Job Load section of the Job Orchestration Canvas when the Load Multiple Source Files check box is selected. When the initial job completes successfully, Nitro checks for additional files to load using the wild card file name entered in step 4. A separate Job History entry is recorded for each file.
- Select Add.
- Repeat steps 3-6 as needed until all jobs are added.
- Select File Trigger from the Jobs menu.
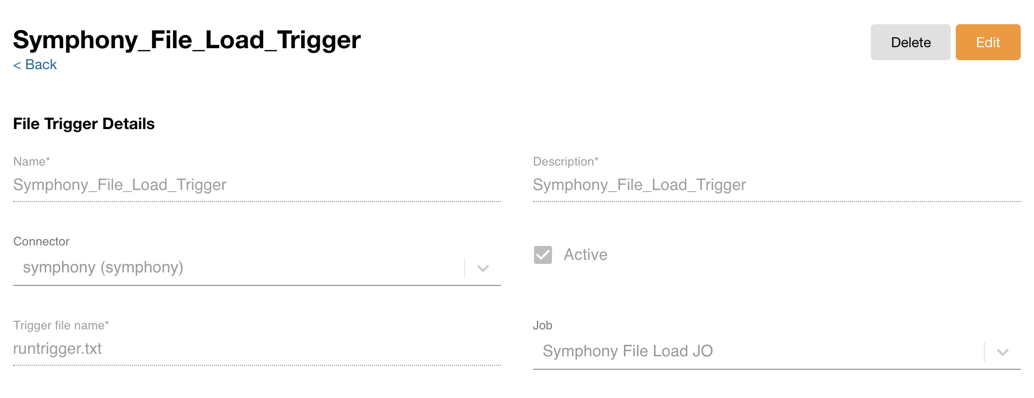
- Enter file trigger information to start the defined job orchestration. A file trigger is required to start a job or job orchestration when a file trigger is placed under a connector SFTP home directory. The following information is required:
- Name - Name of the file trigger
- Description - Description of the file trigger
- Connector - Select the connector to put the file trigger
- Active - When this check box is selected, putting the file trigger kicks the selected job or job orchestration
- Target file name - A file trigger can be a source file to load or a dummy file. (0 byte file) Similar to the current control file, when putting the file trigger to a connector SFTP home directory, run the selected job or job orchestration.
- Job - Select a job or job orchestration to run based on the file trigger
- Select Save.
- Place the file trigger in the connector’s SFTP home directory.
- Place all source files to be loaded by the job orchestration, and started by the file trigger, before the file trigger in the home directory.
Users can delete file triggers that are no longer needed, freeing up valuable space.
To delete File Triggers:
-
Select File Trigger from the Jobs menu.
-
Select the File Trigger to delete.
-
Select the Delete button.
Editing a Job in an Orchestration or Cloning a Job Orchestration
To make it easier to edit a job within a job orchestration or create a job orchestration, admins can now edit jobs or clone existing Job Orchestrations. For example, if one job in a job orchestration fails, there is no way for the admin to restart it at the point it failed. WIth this enhancement, the admin can clone the job orchestration, remove the jobs that have already completed, and restart the job orchestration from where it failed so that any remaining processes can complete.
To edit a job in a job orchestration:
-
Open the job orchestration that contains the job you want to update.
-
Open the job you want to update.
-
Edit fields as desired. The From Job field is not editable.
-
Select Save.
-
Run or schedule the new_job_orchjob orchestration.
To clone a job orchestration:
-
Open the job orchestration you want to copy.
-
Select the Clone button.
-
On the New Orchestration page, complete the name, display name, and description fields.
-
Select Save.
-
Run or schedule the job orchestration.
Restarting a Job Orchestration at a Specific Job
Since a job orchestration is made up of several jobs, admins can now restart the orchestration at the job that caused the orchestration to fail. This eliminates the need to rerun the entire orchestration which risks duplicating data, or manually starting each job in the chain after the job that failed, which is time-consuming.
To restart a job orchestration at a specific job:
-
Log into the NAC.
-
Select Orchestration from the Jobs menu.
-
Open the failed job orchestration.
-
Select the failed job.

-
Select Restart Job From Here on the Node Details window.
-
Select the job(s) you want to run.
-
Select Restart Job From Here.
If the selected job has parallel jobs at the same layer, a job list displays.