Exporting Data Using Outbound Connectors
Nitro supports exporting data using outbound connectors for AWS S3 and SFTP.
Exporting Data Using AWS S3
Nitro customers using Amazon Web Services (AWS) can export data in bulk to their own Amazon S3 bucket using Outbound Connectors. This allows Nitro to exchange data with commercial and enterprise data applications.
Two variables are available to support date and datetime formats without hyphens for use in outbound connectors:
- $[CDW_jobYYYYMMDD] - Stamps the job start date in YYYYMMDD format
- $[CDW_jobYYYYMMDDHHMMSS] - Stamps the job start datetime in YYYYMMDDHHMMSS format
AWS Outbound Connector Prerequisites
Before provisioning a new outbound connector, customers must do the following in their AWS account:
- Create an S3 bucket. This serves as the target for the Nitro outbound connector.
- Ensure the Block all public access checkbox is selected in the Permission section of the S3 settings.
-
Create an IAM Role for Nitro to use to connect to the S3 bucket and load data:
- The trusted entity type is 'Another AWS account '
- The Account ID is 822646232312 (the Nitro Production AWS Account ID)
- The IAM Role must be the S3 bucket owner
- Create a Policy for the S3 bucket. This is used by the IAM Role to load data to the S3 bucket. The Permission must enable the following actions:
- PutObjects
- ListBucket
- GetBucketLocation (If the target S3 bucket is in a region other than us-east-2)
- Attach the newly created Policy to the newly created IAM Role.
Example
{
    "Version": "2012-10-17",
    "Statement": [
        {
            "Effect": "Allow",
            "Action": [
                "s3:PutObject",
                "s3:GetBucketLocation",
                "s3:ListBucket"
            ],
            "Resource": [
                "arn:aws:s3:::cdw-verteo-demo-s3/*",
                "arn:aws:s3:::cdw-verteo-demo-s3"
            ]
        }
    ]
}
Creating an AWS Outbound Connector:
To create an AWS outbound connector in Nitro:
- Log into the NAC.
- Select Outbound from the Connectors menu.
- Select New Connector.
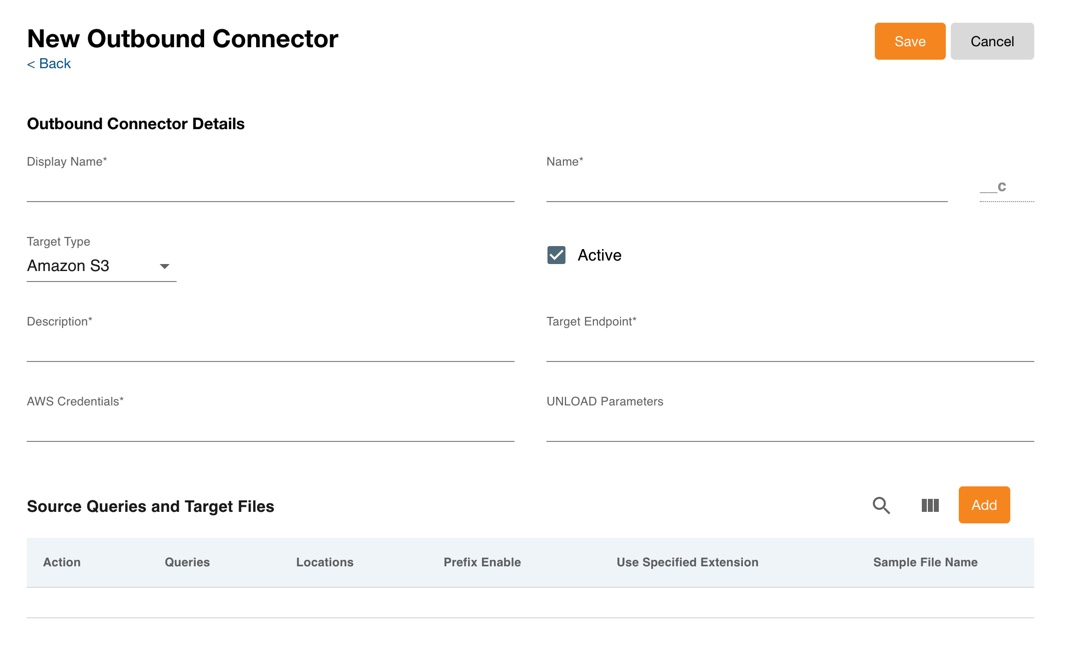
- Enter the display name and connector name.
- Select Amazon S3 as the Target Type.
- Select the Active checkbox.
- Enter the following information for the connector:
- Description
- Target Endpoint
- AWS Credentials - from the access role created in AWS, for example, "arn:aws:iam::755709757004:role/vcdw-verteo-S3RemoteAccessRole"
- UNLOAD Parameters
- Select Add to open the SQL editor.
- Enter the source query(s).
- Enter the Target Location and Filename. Leave the Use specified extension? check box selected to preserve the specified filename on export.
For example: call_data/call_data.csv (AWS S3) S3 Home > call_data > call_data.csv > call_data.csv
If the Use specified extension? check box is deselected to allow Nitro to append the exported filename, the previous filename example would instead be: call_data/call_data.csv (AWS S3) S3 Home > call_data > call_data.csv > call_data.csv000.
Each exported file must be less than 5GB. To exceed this limit, users must configure the MAXFILESIZE option on the unload parameter field (MAXFILESIZE 5GB).
- Select Save to close the query page.
- Select Save to create the outbound connector.

Nitro supports the Amazon Redshift UNLOAD command options that are currently supported as documented here https://docs.aws.amazon.com/redshift/latest/dg/r_UNLOAD.html. If the GZIP option is used in Unload parameters, the ".gz" extension is automatically assigned to the exported filename. If the Use specified extension? check box is selected, do not specify the region parameter in the UNLOAD command. Use specified extension? handles cross-region data transitioning internally.

Generating the Trust Relationship
After an outbound connector is created in Nitro, admins must generate the trust credentials in the proper JSON format needed for the target S3 bucket. This makes it easier to write data to S3 and eliminates the need for a support ticket.
To retrieve the JSON trust credentials:
- Log into the NAC.
- Select Outbound from the Connectors menu.
- Select the outbound connector to open it.
- Select the Key icon. A modal displays with the JSONs corresponding to the Nitro instance.
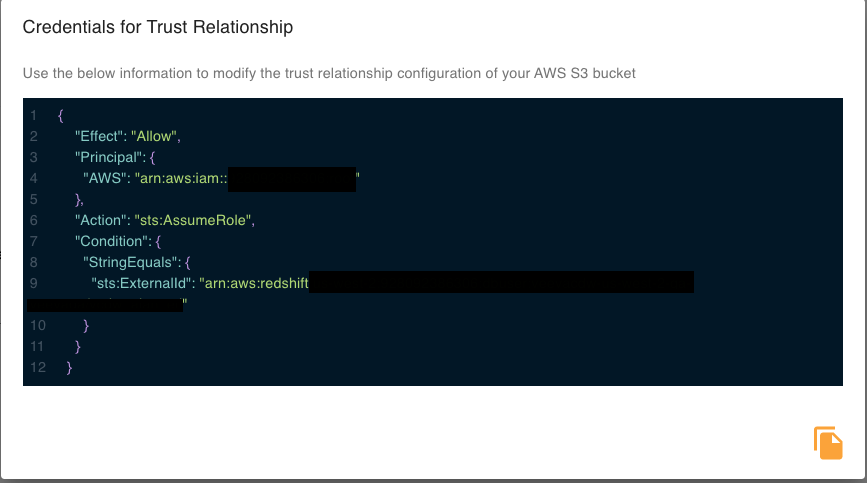
- Select the Copy to Clipboard icon.
- Select anywhere outside the modal to close it.
- Log into the AWS Console and paste the JSON to the Trust Relationship of the IAM Role.
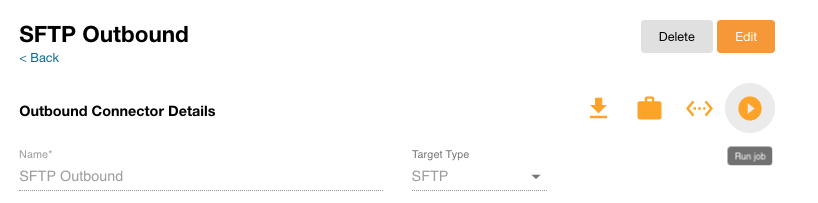
Running the Export
- Log into the NAC.
- Select the appropriate instance from the drop-down menu in the top right corner.
- Select Run Job.
- Select the appropriate outbound connector.
- Select Run Outbound Connector Export.
- Select Execute.
Users can also schedule a Job to run the export.
.png)
Exporting Data Using SFTP
Nitro customers can export data in bulk to SFTP targets using Outbound Connectors. SFTP is a widely leveraged protocol for bulk data transfers between IT systems within the Nitro customer base. With support for SFTP targets in Outbound Connectors, Nitro is better able to integrate with these systems without the need for custom development or support from additional infrastructure.
The Outbound SFTP connector supports the SSH-ed25519 algorithm by default.
Creating an Outbound Connector for SFTP Targets
To create an outbound connector in Nitro:
-
Add the following IP addresses to the allowlist if your corporate network has firewall rules defining from where data can be sent:
Region IP Addresses US 3.136.3.234
3.19.87.94EU 3.67.123.91
3.125.253.104AP 35.72.176.170
54.92.49.234 - Log into the NAC.
- Select Outbound from the Connectors menu.
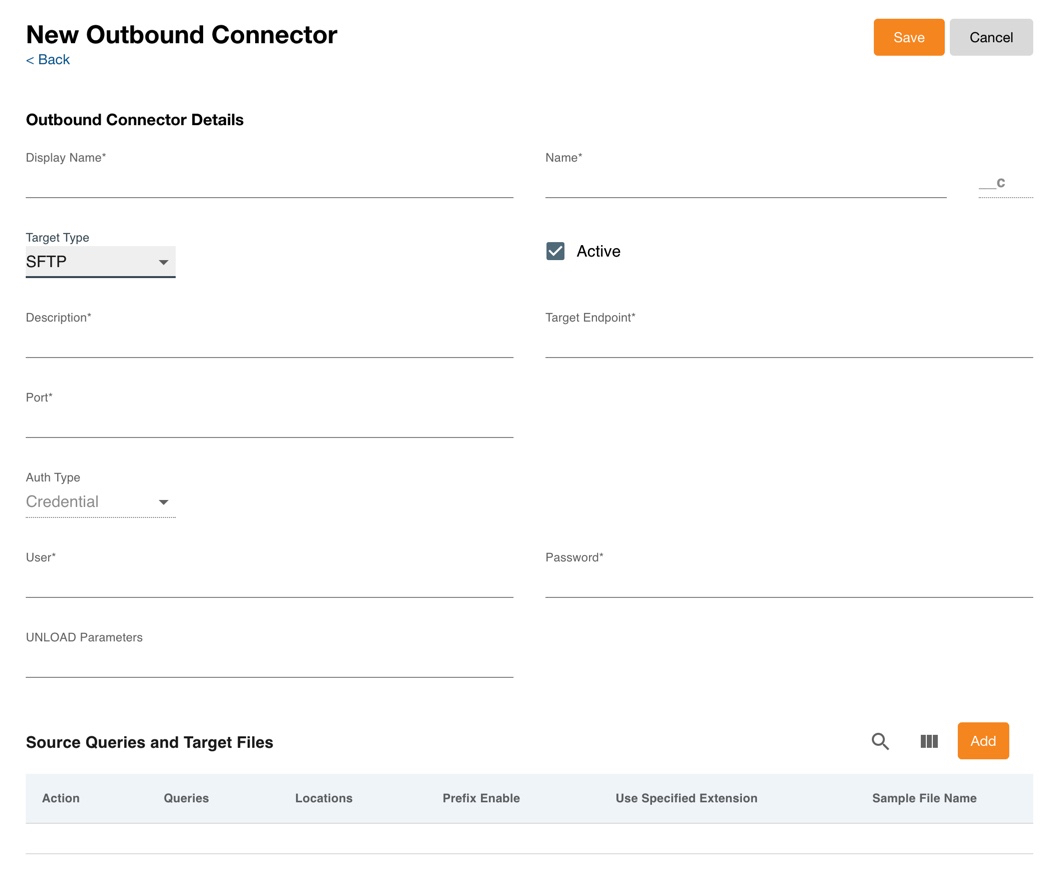
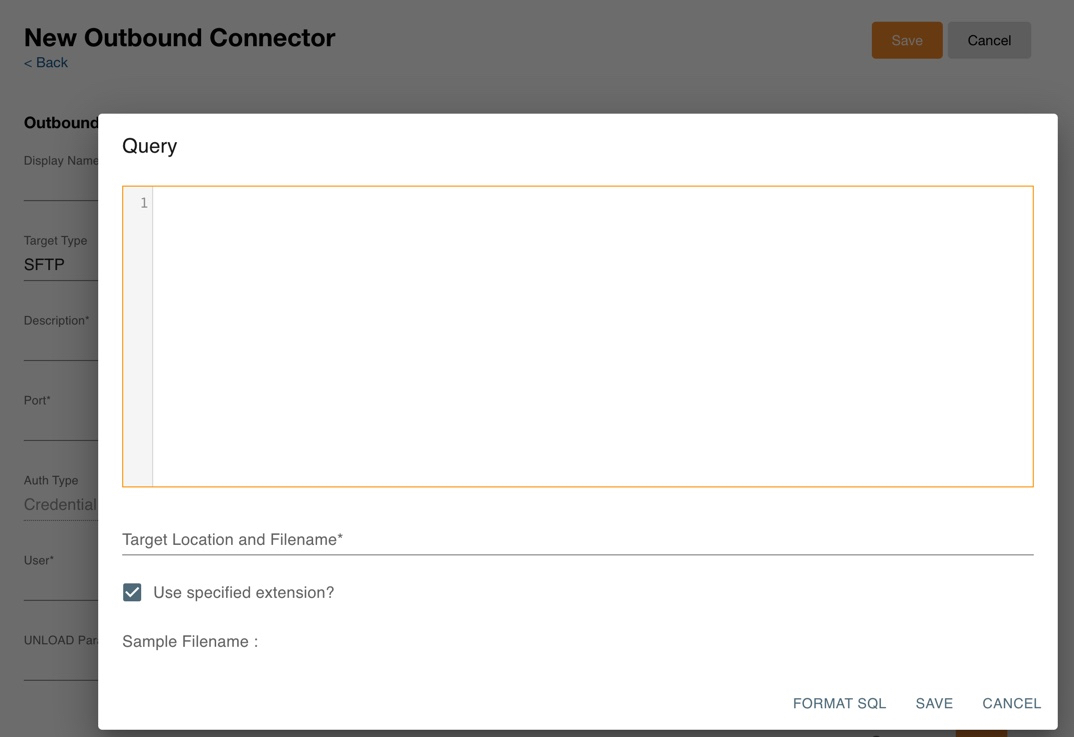
- Select New Connector.
- Enter the display name and connector name.
- Select SFTP as the Target Type.
- Select the Active checkbox.
- Enter the following information for the connector:
- Description
- Target Endpoint - the endpoint for the SFTP server
- Port - the SFTP port
- Auth Type - this is defaulted to Credential and is not editable
- User - Username for the SFTP server
- Password - Password for the user
- UNLOAD Parameters
Nitro supports the Amazon Redshift UNLOAD command options that are currently supported as documented here https://docs.aws.amazon.com/redshift/latest/dg/r_UNLOAD.html. If the Use specified extension? check box is selected, do not specify the region parameter. Use specified extension? handles cross-region data transitioning internally.
- Select Add to open the SQL editor.
- Enter the source query(s).
- Enter the Target Location and Filename. Leave the Use specified extension? check box selected to preserve the specified filename on export.
For example:
account/HCO.csv (SFTP Server) User Home > account > HCO.csv
If the Use specified extension? check box is deselected to allow Nitro to append the exported filename, the previous filename example would instead be: account/HCO.csv (SFTP Server) User Home > account > HCO.csv000.
Each exported file must be less than 5GB. To exceed this limit, users must configure the MAXFILESIZE option on the unload parameter field (MAXFILESIZE 5GB).
- Select Save to close the query page.
- Select Save to create the outbound connector.
If the SFTP user has a subfolder and transfers the files to the subfolder, specify the subfolder + ‘/’ in the Target location and Filename field.
Running the Export
Select the Run Job icon on the connector detail page. Users can also schedule a job to run the export.